Tuesday 2 October 2012

Top 6 Best Features of iOS 6


Have you missed the Apple’s new WWDC 2012 launch event which they showcased plenty of interesting things like new MacBook Pro Models, iOS 6 features and Mac OS X Mountain. Here today we will discuss the top 6 best new features of iOS 6 for Apple iPhone 3GS, iPhone 4 and 4S, ipad 2 and new iPad. iOS is undoubtedly the world’s most advanced mobile platform, which continues to redefine the features and applications available on a mobile device? It is possible to create amazing applications using iOS SDK and Xcode. Storing documents, publishing magazines with Newsstand, quickly integrating Twitter functionality and audio, video streaming with Airplay are some of the apps a user can access using iOS. The powerful features of iOS 6 are a reason why the user has amazing features while using it. iOS 6 is streamlined to be compact and efficient and it has the advantage of the iPad, iPhone and iPod hardware.
iOS 6 offers a whole new range of features .It offers more than 200 features more than its previous versions. The exciting newly added features are Maps, Siri, Shared Photo Streams, Passbook,Facetime and Safari. 

Some of the other best features of iOS 6 are discussed below:

1. Siri: The most attractive feature of IOS 6 is the Siri. It lets users know of the latest scores, statistics results for a team and players, ratings for movie theaters and many more. Siri helps users to make reservations without even have to tap the pad around. Siri is another feature which can tell you the latest scores, statistics about teams and players. It also updates users about latest restaurants in town and movie review. The user can click on “Launch Flight Tracker” to know about the latest flight schedules and respective gate of departure. Updates can be posted on Facebook and Twitter via Siri.
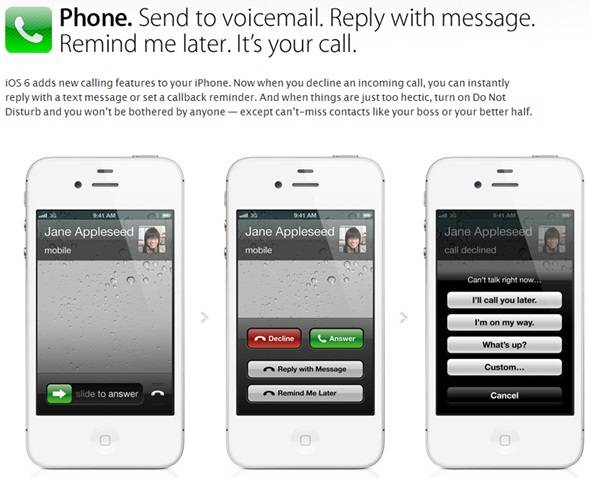
2. Phone Calling Feature: iOS adds new features to the iPhone. The users when busy can reply by a suitable message or can set a reminder to call again. The added advantage is that when the user is very busy, can turn on the “Do not disturb”. This manner the person can continue working without getting bothered.
3. Apple Maps: Seems that Apple 3D maps going to give tough competition to Google Maps. The buildings will be view in 3D mode zoom in and zoom out option gives you more detail look of the places. The Map application is beautifully designed to capture the minutest detail of every picture. They are vector based and when the user tilts it, the maps display the street names. The real time traffic updates and road by road areas are updated as the user navigates through the map. It also gives you accurate location of destination where you willing to go. They have added voice navigation feature in the maps so you can reach destination safely with simple directions.
4. Passbook: Passbook is one extremely easy to use feature which allows booking of movies, retail coupons, loyalty coupons and collecting boarding passes very convenient for users. It provides information about boarding gates to passengers, expiry of coupons, and the right directions to the seats in the movie theater.
5. Shared Photo Streams allows you to share pictures with friends and colleagues anywhere, anytime. It can also help to upload video and audio streams. Users can like the photos and make comments. The Photo Streams allows user to share pictures, video streams with the people they want. The users can also share pictures with non Apple users by uploading them on the Web. It is also suitable for people who are not using an Apple Phone as they can access the photos through internet.
6. Facebook Direct Integration: Facebook allows users to connect to friends and family by sharing their latest happenings .Users can upload pictures, videos straight from Camera or Photos. Siri can help to update the latest game scores and status updates on Facebook. Users can synchronize their friends on Facebook with the contact list to stay updated with the latest happenings. This is not the end of apps. A user can never miss friend’s birthday as the Calendar sets an automated reminder for it. Facebook remains the very popular and obvious choice for users to connect with their old friends, family and colleague’s .This feature allows users to update their status and even their current location to stay in touch with their close ones.
Nancy Rorie is a blogger who writes about led stripe lights, automobiles and home improvement tips.

Root Sony Xperia Arc / Arc S Official Android 4.0.3 ICS firmware 4.1.A.0.562

Previously we shown up a quick tutorial for installing official Android 4.0.3 update on both Sony Xperia Arc LT15i / Arc S LT18i. Sony has released same ICS firmware 4.1.A.0.562 version for both android phones. Both devices look identical to each other and they have been loaded with similarfeatures and specifications. The name itself indicates that it was official update so it doesn’t come with pre-rooted; we need to root it manually for both Sony Xperia Arc LT15i / Arc S LT18i with some rooting applications DooMLoRD’s kernel and flashing it via Fastboot. The clockworkmod recovery will help you install some important zip files directly from the phone itself and it will be time saving process for all users.
Pre-Requisites:

1. Required original flagship devices Sony Xperia Arc LT15i and Arc S LT18i and both phones must be running with official android 4.0.3 ICS 4.1.A.0.562 either locked or unlooked bootloader.
2. Windows PC with working USB Data Cable.
3. You must download and install the ADB drivers on your PC from here. (Filename Flashtool-drivers.exe).
4. Back up all data like Call Log, Contacts, SMS, APN, MMS settings and also disable antivirus in the computer. Sometimes antivirus may interrupt the rooting process.
4. Enable USB debugging in your Sony Xperia Arc / Arc S from the path “Settings Applications >Development > USB debugging”. The option of USB Debugging should be ticked.
6. Enable Unknown Sources on your device. You can go through from this way "Settings SecurityUnknown Sources", the check mark to enable the option.

Steps and Procedure How to Root Sony Xperia Arc LT15i / Arc S LT18i on official Android 4.0.3 firmware.

Step 1. First of all you need download all those three files from below.

Superuser package Here (Superuser-3.0.7-efghi-signed.zip, 625 kB)
ARC-DooMKernel file Here (ARC-DooMKernel-ICS-BETA-v04-lower-boot.img, 7.6 MB)
Fastboot Here (Fastboot.zip, 404 k)

2. Connect your Device with PC with the help of USB data cable.

3. Now transfer the Superuser-3.0.7-efghi-signed.zip file from your PC to SD card of your phone.

4. When you copied the file into the Phone, then disconnect the device from the PC.

5. Extract the Fastboot.zip file into C drive. Then you will get the following path C:\Fastboot\Fastboot. In this folder you have 4 files which you are extracted them. See the below image
6. Copy ARC-DooMKernel-ICS-BETA-v04-lower-boot.img file into the C:\Fastboot\Fastboot folder. Therefore you have 5 files in that folder.

7. Connect your phone to the PC via original USB cable. This time you need to enter into fastboot mode by following this procedure. First connect your USB data cable to PC, now HOLD the Menu Key on your phone then connect the other end of the USB cable to your device.

8. Now, open RUN command prompt in your PC by pressing windows logo button + R key in keyboard. Type cmd in the run box and Enter the following below commands on the command prompt.

cd c:\Fastboot\Fastboot
fastboot boot ARC-DooMKernel-ICS-BETA-v04-lower-boot.img
9. This will install the file to your phone. Your phone will reboot automatically.

10. When the phone has booted up, when you see ‘Sony’ logo, and Blue LED lights up of the phone, begin pressing the ‘Back’ button continuously. This will put your phone into Clockworkmod Recovery mode.

11. In the Recovery Mode, select “install zip from sdcard” then select “choose zip from sdcard” and then choose “Superuser-3.0.7-efghi-signed.zip” file.

12. After the installation has completed, select “++++Go Back++++” and then select “reboot system now” to reboot your system.

13. You should also install “Busybox” on your Smartphone, download it from Google Playstore.

You can also Root via One-Click Method

1. Download the Rooting toolkit package from here. (file name DooMLoRD_v1_Xperia-2011-ICS-ROOT-emu-busybox-su.zip)
2. Extract the downloaded file using either winrar or winzip.
3. Connect the Phone to your PC with USB cable.
4. In that extracted folder you can see the file name called runme.bat. Double click the runme.bat, then rooting process will start and it will take some time to complete the job.

5. When process is finished you will get a message like “All Done”. Finally your phone is rooted without any problems.
6. Disconnect your phone from the PC and install whatever applications you like superuser, setcpu and much more.

Congratulations, you have rooted your Sony Xperia Arc / Arc S. Share with us if you face any problem, we will help to resolve the same.

Install Android 4.0.4 ICS Update on Motorola Razr XT 910


Here is another quick tutorial How to Install Manual Android 4.0.4 Firmware Update on Motorola Razr XT 910. Motorola Razr XT 910 is a great Android Smartphone from Motorola. The music is awesome beside that you will love the Motoblur UI. Motorola released an Android 4.0.4 Ice Cream Sandwich ICS firmware update for Razr XT910 Brazil users a week ago, but many users missed it. Brazil people got this ICS update officially and its firmware version number is dubbed as651.167.3370.XT910. This OTA update is not yet officially released for all countries but you can install this update manually on your device. Motorola wants to release this official update for other regions too but we don’t know the exact release date when this update will be going to available for all Razr XT 910 devices. This is just to compete with other new Android 4.0 ICS equipped phones launching in the market. This is a recovery flash able version of the firmware. You just need a rooted Moto Razr with Custom recovery installed and then you can install the firmware. We have created a detailed guide so that you can install the update easily with the guidance.
Warning: Please proceed with this article at your own risk. Neither we nor the developer will hold any responsibility or liability if you damage your phone following the methods and steps mentioned in this article.

Note: Make sure that you device is rooted on Android Gingerbread 2.3.6 and also installed clockworkmod recovery on your device. If you done above steps then you can directly apply this update without any problems.

Pre-Requisites:

1. You should apply the methods and steps mentioned in this article only on Motorola Razr XT910. Trying the steps mentioned in this article on any other device or any other model of Motorola may produce undesired results.
2. Ensure that there is at least 70% charge with your device, so that there will be no Power interruption during the process.
3. Please backup all essential data’s on your phone, to assure that there will be no data loss during the process.
4. Disable all security programs like Antivirus and Firewall from your computer and uninstall the same from your device.
5. Enable USB Debugging in your Motorola Razr from the path “Settings > Applications > Development > USB debugging”. The option of USB Debugging should be ticked.

Steps and Procedure to Update Motorola Razr XT910 to Android 4.0.4 ICS Firmware:

1. Download the firmware package from here on your PC. The file name is blur_version.651.167.3370.xt910.brasil.en.br.zip and size will be 347MB.

2. Connect your device with PC via USB Data Cable. Copy that downloaded zip file into SD card of your device.

3. Disconnect the phone from PC and Reboot your phone to enter it in Recovery Mode. To do so, Press and hold the Power Volume Up + Volume Down buttons together for few seconds until you see the Recovery Menu. You will see a triangular robot press the Volume buttons once to confirm entering into Recovery.  

4. In Recovery Menu you need to select "Wipe data/factory reset" and also select "Wipe Cache partition". It will delete your phone data like sms, contacts and apps.

5. Now, from the Recovery Menu, select “install update from sdcard” with the help Volume buttons and Power button to confirm selection.

6. Choose the “Blur_Version.651.167.3370.XT910.Brasil.en.BR.zip” file in your SD card device.

7.  After the installation process has completed, your phone will automatically reboot.

8. Now, install OTA root keeper to restore root from here.

That it, you have successfully upgraded your Motorola Razr Smartphone with Android 4.0.4 ICS. Share your joy with us or let us know your issues, we will help you in resolving the same.

How to Root Samsung Galaxy S3 GT-I9300 XXALE8 Firmware


Have you owned Samsung Galaxy S3 android device and thinking to root it? Here we have simple tutorial how to root Samsung Galaxy S3 GT-I9300 on Android 4.0.4 ICS XXALE8 firmware. Samsung Galaxy S 3 is the hottest Android phone in the market. Samsung Galaxy S 3 has got some marvelous features like 4G support, a large 4.8inch display with 306ppi pixel density. Some other features of S3 are its large internal memory size, RAM, Operating System, Corning Gorilla Glass, Camera and best Accessories etc. What if you can even make it better? Well, you really can. You can over-clock your device, remove ads from all your free apps and a lot more things but for that you first need to root your phone. How? That’s what we will be telling you all. So, here is the tutorial on How to Root Samsung I9300 Galaxy S3. Before beginning with the tutorial, we suggest you to read things like Things Needed, Note and Disclaimer properly.
Note: Once your phone is successfully rooted, your phone’s warranty will end. Make sure you follow this tutorial if you have the stock firmware version XXALE8 on your phone and if it isn’t there then we don’t suggest you to continue rooting. You can also checkout in which firmware the phone was running SettingsAbout Phone. Also, make sure you backup everything present on your phone.

Disclaimer: Rooting is a really technical work, so we suggest you to perform it under the guidance of an expert. And in case you brick your phone or damage it in anyway then we should not be held responsible for the damage done.

Things Required: 

1. Original Flagship Samsung Galaxy S3 Phone.
2. Make sure Enable USB debugging is checked on your S3 by going to Settings > Applications > Development > USB Debugging.
3. Backup all your data like phone contacts, sms, call logs and apps.
4. Make sure your computer is having all the necessary S3 drivers pre-installed.
5. You phone should have at least 70% of remaining battery.

Steps and Procedure to Root Samsung Galaxy S3 GT-I9300 Android 4.0.4 ICS XXALE8 firmware

1. Download below both zip files into your PC.

  • Odin3 v3.04 flashing tool from here.
  • CF-Root for Samsung Galaxy S3 v6.3 rooting package from here.

2. Once you downloaded the both files. Extract them in a separate folder and place it on the desktop (or anywhere else). Below you can look at image then you will get clear idea. In Odin folder there will be odin.exe with three supported files and rooting package folder contains CF-Root-SGS3-v6.3.tar file.
3. Open the Odin folder and Launch the Odin application by double clicking the Odin3 v3.04.exe.

4. Now switch off your phone and boot into Download Mode. For that you need to press and holdingVolume Down Menu Center + Power On Buttons together. Once you get android robot image then you can release all those buttons.
5. Once your phone enters into the download mode. Then connect the phone with your computerusing the USB data cable. If you will see the light blue color in ODIN ID:COM field then your phone is detected and if you don’t try re-connecting your phone with the computer.
6. Now on ODIN go to, PDA option and then browse to the file that we extracted from the rooting package folder there locate the CF-Root-SGS3-v6.3.tar file.
7. Make sure only F.reset Time and Auto reboot options are checked.

8. Click on Start Button. Then you device will be reboot automatically and it will take some time to complete the rooting process. In Odin you can see green color in the ID:COM field, that means your phone is successfully rooted permanently without any problems.

In Rooting it will install superuser app, clockworkmod recovery mode and CWM utility manager in the phone. Now you can easily install custom based ROM like CyanogenMod 9 rom on Samsung Galaxy S3.

Author’s Bio: This article is written by John. John is a property dealer and an Android developer who’s living in the United Kingdom. You can contact John in case you Need A Property UK or in case you are searching for real-estate advice's.

Install CyanogenMod 9 Android 4.0.4 ICS Motorola Defy Plus


Finally we found the tutorial How to Install CyanogenMod 9 CM9 Android 4.0.4 ICS custom Firmware rom update on Motorola Defy Plus. Motorola Defy+ Plus is a rigid Android Smartphone from telecom giant Motorola. They have done pretty fine with this phone but we are not much impressed with battery. The phone is totally water and dust resistant. For people who work on very dirty atmosphere or keep throwing and dropping their phone here and there can go for this phone. Recently, XDA dev forum member has launched Android 4.0.4 ICS custom ROM for Defy Plus and it is not official yet still in beta stage. This custom developed ROM is based on CyanogenMod 9which can be installed manually, most of the things are working. Being based on AOKP this ROM isfast and performing nice with battery as well. You just need to root your Defy plus on current firmware which you are currently running and also install Custom Recovery too.

Warning: Be careful while following the methods and procedures mentioned in this article, as they can completely damage your phone or brick it for which neither we nor the developer will hold any responsibility.

Let see which features will work on this latest firmware rom version. Wi-Fi connection runs good with no more frequent disconnections, camera with panorama mode, plays 720p videos without any lagging.

Pre-Requisites:

1. The methods and steps mentioned in this article are only meant for Motorola Defy Plus users. Trying them on any other device or any other model of Motorola may produce un-desired outputs.
2. Please charge your device so that there is at least 70% charge with it, to assure that there will be no Power interruption during the process.
3. You should backup all essential data’s on your phone, as there are chances of them getting lost during the process.
4. Disable all Security programs like Firewall and Antivirus from your computer and uninstall the same from your phone, as these security programs generally tend to interrupt the process.
5. Enable USB Debugging in your respective Motorola Defy Plus from the path “Settings > Applications > Development > USB debugging”. The option of USB Debugging should be ticked.

Steps and Procedure to update Motorola Defy+ with ICS 4.0.4 Firmware:

1. Download the latest ICS for the Motorola Defy + plus from here and Google Apps package fromhere to your computer. Copy both the files and place them on the root directory of your phone’s SD card.

2. Reboot your phone so as to enter it in Recovery Mode. To do so, press the Volume Down + Power buttons together for few seconds until you see the Recovery Menu.

Note: After entering into recovery mode you should wipe the cache Partition & must wipe Data/Factory reset. If you done above two things then procedure for next step.
3. Now, from the Recovery Menu select “install zip from sdcard” then select “choose zip from sd card” and then choose the firmware package you’ve downloaded and placed on the SD card.

4. After the firmware is installed you will be taken back to the Recovery Menu, repeat the same procedure to flash the Google Apps Package. That is, “install zip from sdcard” -> “choose zip from sdcard” and then browse to the Gapps package from your SD card.

5. When the Google Apps Package has been successfully flashed, return back to the Recovery Menu and select “reboot system now” to reboot your system and land into the new installed ICS firmware.

That’s it; you’ve successfully updated your Motorola Defy+ with ICS 4.0.4 Firmware. Share your joy with us or let us know if you have any issue, we are here to find a solution for the same.
 

Mobile Updates Copyright © 2011 -- Template created by O Pregador -- Powered by Blogger